Background

Thursday, December 9, 2010

Making Christmas Presents!!

As a crafter, I am lucky enough to be blessed with a husband who also likes to make things (more manly things, of course). Since he does enjoy things like this, gifts for him end up feeding my crafting hobby as well :) You say you want a table saw, honey? Sounds good to me. Could you use a power drill? Yes? Ok. (yay for me too!!!)

We've been making our Christmas presents for a few years now. Sometimes things are 100% crafted by us, other times I design something that we have printed for friends and family. I can get inspired by some random things. Sometimes I swipe ideas for presents directly from my friends houses. Sometimes I think of a way to solve a need. And other times, I am completely at a loss. I have 2 brothers in law and one brother that it is pretty much impossible to shop for on a budget. Video games and high tech gadgets aren't really going to fit into our present budget this year. There's no way I'm spending $50 on a video game for 3 brothers. I love ya bros, but we just can't afford it (none of these brothers read this blog by the way). So I came up with a way to incorporate their love for video games with something I could make. A friend's hubby made her a clock last year, and said it was super easy.....so here I go!!

The materials:

NES games - super cheap. Check craigslist, used game stores, ebay, or yard sales/flea markets.
Clock Kit - I used my amazon gift cards from swagbucks to get these for FREE. The video games are 3/4" thick, so you'll need a clock kit that will fit that size clock face.
Drill/Bits - The drillbit I used was 5/16" - it was the perfect size for my clock kit.
Glue - (Don't use the Amazing Goop I have pictured here) it didn't work for me at all....except to make an amazing goopy mess! Instead, use a super adhesive for nonporous surfaces at pretty much any store.

Spray Paint - .99 I took offense to the metal colored clock hands and plumbing pieces. If you don't, you can skip this!


<------Plumbing pieces - $1.19 for 4. I used something called a 1.25" one hole EMT strap (you'll need 2 per clock). I found it in the plumbing/electrical aisle at Lowe's. They just screamed clock backs to me. I like the "modernist" look to them. As you can see, these 2 plumbing pieces have been cured and are no longer offending me by being silver colored.


First, measure where you want your clock pieces to go and mark the center so you know where to drill your hole. Like I said, 5/16" was perfect for the size clock movement that I had, but yours might be different.

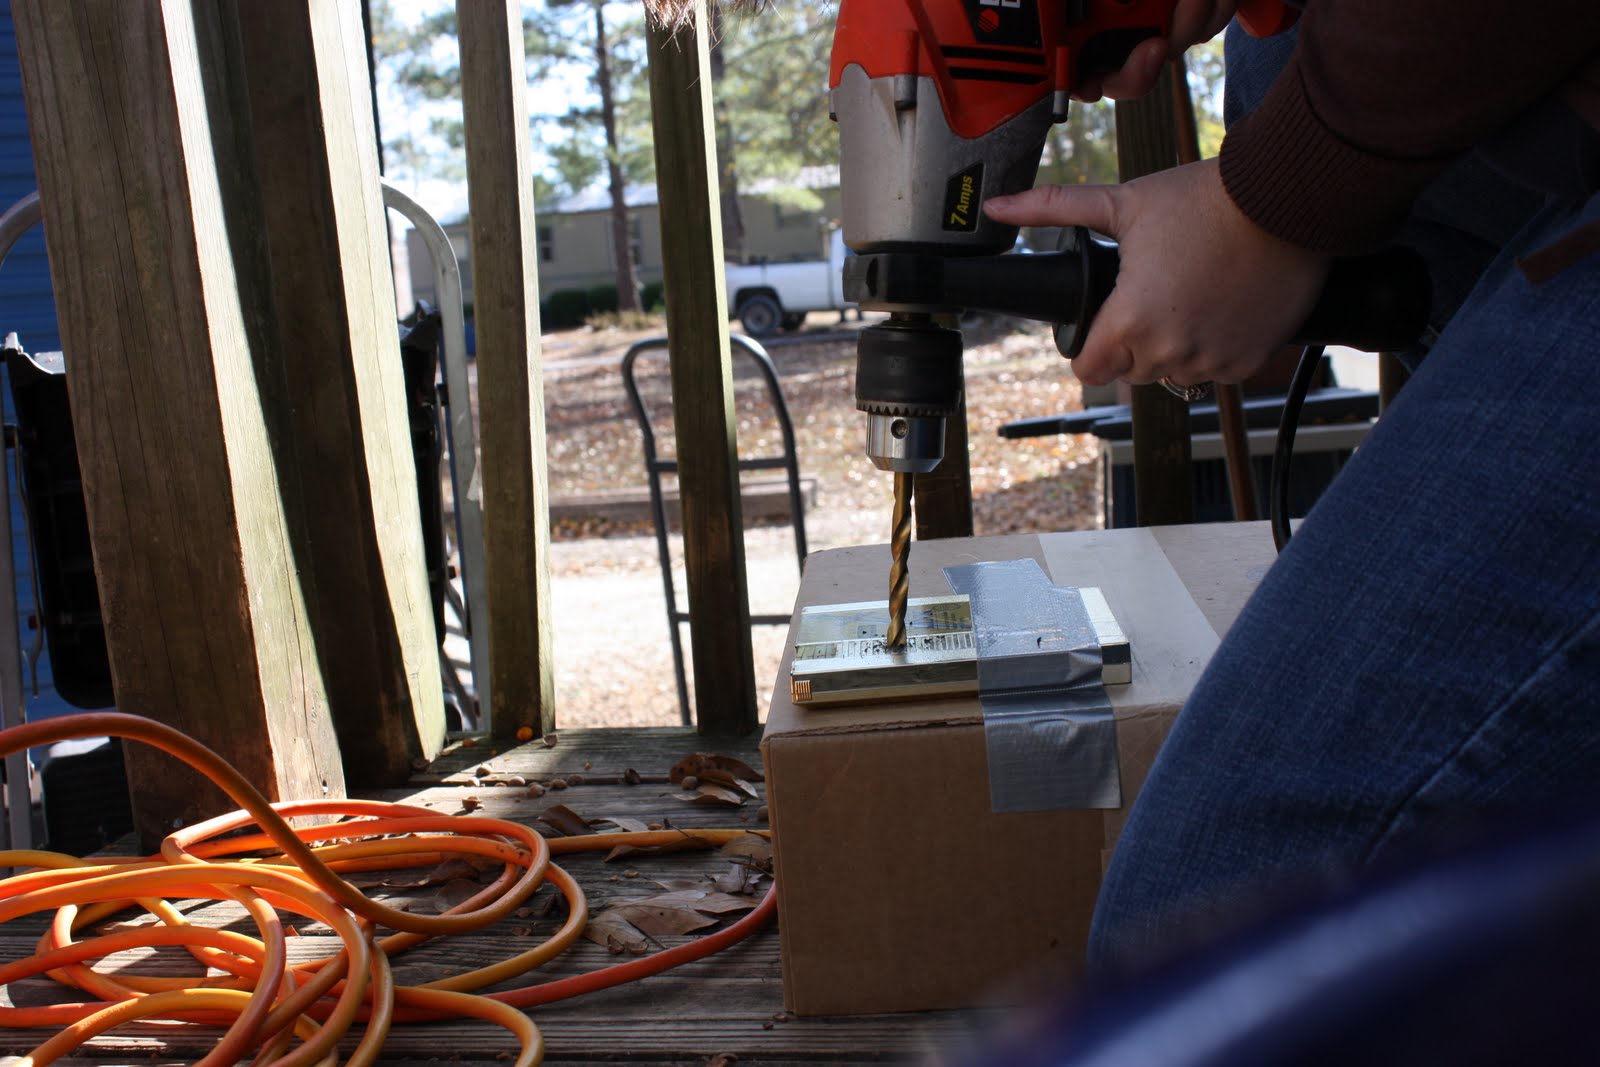
When Drilling, try for 90 degrees. And DON'T press too hard - it will crack the plastic (not that I speak from experience or anything).

I used duct tape to keep my game steady. And I drilled on a cardboard box so that I'd know when I went through the game.

Make sure the hole is the right size, then proceed..


Attatch the plumbing pieces to the back of your clock/game with a super duper adhesive. I ONLY used duct tape to keep them in place while the glue dries TEMPORARILY (though my dad and RedGreen would be a proponent of designing entirely out of the "handy man's secret weapon"). One on the left side, one on the right. Make it so the bottom of the piece is a little above the bottom of the game (so that the clock will sit at an angle and not tip over). Let it dry at least 24 hours (or the recommended time on your glue)

Thread your clock pieces through according to the directions, and you are set. I'm excited to find a fun little box for these and watch the boys open their gifts!


Saturday, December 4, 2010

FREE fun day.

You know I love a bargain.....right? Well, I do. I LOVE that me n little man got to spend the day doing fun stuff for FREE.

I was a little nervous taking him to the Lowe's building clinic - its supposed to be for 2nd graders - but we had a great time. He was a little wary when he was walking into a room of big kids with hammers.

Jman quickly overcame his fears once he realized HE got a hammer too. Not a lot of his banging was productive, but he started getting really excited once he realized exactly what was coming.

He really loves trains, and points them out whenever he sees one (usually in the store or in a book...not too many trains here in Jacksonville). So when he saw the other kids were putting together a train, he started hollering "CHOO! CHOO!"

The only thing that upset him was when we had to leave. He thought we weren't taking the train with us.... Don't worry little man, we'll be going back next week. (They're having clinics for the next 2 weeks where you can build a passenger car and an Engine...they'll all hook together in the end!)

If you want to sign up with your kiddos, go here:
https://www.lowesbuildandgrow.com/Home.aspx

Apparently they have things all the time. It was our first trip, So Jayson got a little Lowes apron. They also get a badge for every clinic they do. So cute!

We had such a good time doing the Lowes clinic, that we went ahead and did the one at Home Depot too. It was a picture frame, and we're going to paint it tomorrow (Jayson wasn't in the mood for pictures at Home Depot, but he sure remembered what to do with that hammer!)

Afterward, we picked up free lunch at Zaxby's -our local store had a deal where if you bought a meal on November 12th, you could get the same thing free in December. Definitely had to take advantage of that!

Next, we headed over to the Hallmark store. Now, that place is SO out of my price range that its not funny. BUT, they recently released some coupons (one $5 one and one $10 one) on facebook.

So we went to look around. BOY! Is that place expensive! We got some wrapping paper for free with the $5 coupon. Its the good stuff too.

Jayson picked up the cutest and softest little Snoopy stuffed animal. He was hugging it so close and giving it kisses. He was saying "want please?" How could I resist?

We got it for free ($10 coupon). We had to pay tax on Snoopy and a chocolate for me, but it was a fun little treat for both of us for about $1.

Thursday, December 2, 2010

Christmas 2010 Card

Love Peace Cheer Christmas 5x7 folded card
Make a statement with custom Christmas cards at Shutterfly.
View the entire collection of cards.

Tuesday, November 30, 2010

Happy Belated Birthday to the USMC!

A few weeks ago we were able to go to the Marine Corps Ball for the 2nd Radio Battalion in Greenville. I always love going to the ball....even if Ben won't dance any fast songs with me. He actually went a whole 30 seconds into a swing song before getting embarrassed that we were the only ones out there :)

Here are a few quotes about the Marine Corps that were found on our tables. (Ben's favorite is the last one....in fact they played a clip of Pres Obama saying it during the Commandant's message to the Corps).


"Among the men who fought on Iwo Jima, uncommon valor was a common virtue."
- Fleet Admiral Chester W. Nimitz

"The deadliest weapon in the world is a Marine and his rifle."
-Gen. John "Black Jack" Pershing, US Army

"Freedom is not free, but the U.S. Marine Corps will pay most of your share."
-Ned Dolan

Friday, November 12, 2010

Happy Birthday to Hunter

Hunter is my friend, Shila's, son. We have recently gotten to know each other again (we went to high school together....9! years ago) Her little man is super cute and has the blondest hair I have ever seen on a baby. For some reason, Jayson is afraid of him. I have no idea why, but I think its a little funny considering he's a year older, much more agile, and taller.

This past weekend, we were invited to Hunter's 1st Birthday party. The theme was (obviously) Rubber ducks....complete with a blowup duckie punch bowl :) Shila made some awesome treats (how cute are those frogs and ducks cupcakes!) and we got together to make the duck/bubble cookies. It was alot of fun, and I heart the fact that she loves to bake even more than I do! Just had to share :)

Friday, November 5, 2010

Lynseys Shower (ACK! This was back in September)

Back when I posted about Jayson's birthday, I was also busy planning a baby shower for my friend Lynsey- who is having her first little girl really soon. She is such a special friend. We haven't lived in Gainesville since 2007, but she remains one of my best friends. When we first got married (and before), Ben and I made some lifelong friends. They're people that we try to visit every time we go to Florida. They're some pretty special couples, we all get along and we were even able to get together (all of us minus Ben) this past summer. Even though life has taken us in different directions, I love them dearly. Even if I don't speak to them every day........every week.....or even every month..... I know that if I ever need a friend, they'll be there, and I hope they know the same goes for them too! MAN! I sure miss you guys! LOL.

ANYWAYS........
The reason for this post was that I wanted to share some of the pictures from the party. Here they are...

Thursday, November 4, 2010

I Heart Photoshop


I've been doing my best to become a better photographer....studying up on aperture, exposure, lighting, and trying to figure out the camera I got for Mothers Day 2009. I always do a little editing in photoshop since they're usually not exactly right when I get them straight outta the camera. But today I found a gold mine. Its called the Pioneer Woman's action set. Ree is an awesome photographer, and she has made it SO EASY to do quick edits that make my ok photos fan-freakin'-tastic! Okay....maybe they're not quite pro yet, but all I have to do is click ONCE and her actions do the work for me!! I'll let the pics speak for themselves. These edits literally took 10 seconds to do with the actions. I just had to choose which one I liked best!


If you have photoshop, you can download her 2 sets of actions HERE (she even gives instructions within the actions on how to adjust the actions so that they are just right for your photo).

*To see a higher resolution of these images, just click on them*

Wednesday, November 3, 2010

Halloween 2010


Despite my last minute panic - We just moved, and I hadn't found a costume for Jayson as of Thursday (Yikes!) - We had alot of fun this Halloween. I found the pattern for the Mario hat here.

It wasn't as hard as I thought it was going to be, and I used a few pieces of felt to make a Mario mushroom treat bag. I used some leftover fabric (Wonder-Under!!) and plain white undershirts to make Ben and I into "Boo"s.

When we got on base, Jayson saw a park and almost mutinied when we didn't go to it. He quickly got over it when he found that when you went up to people sitting in chairs or knocked on doors you got CANDY! It didn't take long before he was saying "Treat! Treat!" to each person at the right time. When he woke up the next morning, they were the first words out of his mouth.

All in all, we had an excellent time, and Jayson didn't want to go home by the end of the evening :)

Saturday, October 30, 2010

Cards are a comin!!!

Now, most of you know that I used to be (ha!) a little nuts.... at least I USED to do hand made cards at Christmas. (GASP!) That only lasted a few years.....or until we had Jayson. And now, I just don't know what I would do with all those little pieces of glitter, paper, and plastic flotsam chillin around the house. I DO know that they would no longer make it into Christmas cards.

I have now completely embraced the photo card. I found some super cute designs over at www.shutterfly.com


They have some fun/silly ones for those of you that can't seem to get a family photo where everyone is looking decent at the same time (I can't be the only one out there!)

<---------- This is one of my favorite "playful" ones

I love the color scheme and the peppermint stripe. I'm really a fan of letting the photos speak for themselves....and this one really lets em shine.


I also like that they give you the option of designing your own from scratch. In case I'm feeling extra ambitious, I can just design it all in photoshop, and upload it to their "classic without edge" design.

http://www.shutterfly.com/cards-stationery/basic-borders/classic-without-edge-5x7-folded-card

I used that option to make the "Joy.....to the world" cards 2 years ago.

We are going to take some Christmas photos after Halloween...we'll see which card best suits our photos then. Look for it in the mail.....sometime (I procrastinate with the best of em!)

Disclaimer: This is a sponsored post written by me on behalf of Shutterfly. However, all opinions are 100% my own.

Thursday, September 16, 2010

Jayson Turned Two!

This cake is tons of fun. It was my first time sculpting rice krispies, which is harder (and stickier) than I thought! All of the icing on the cake is buttercream since I don't have the confidence (or the tastebuds) for fondant.

The cake is sitting on a large duplo base plate (supported by a pan to hold all that heavy cake!) So it will definitely see future use. (And it was free from Amazon using swagbucks!!)


The Birthday Boy!!!

From the second he woke up, and all day long, Jayson was saying "Cake. Mmmmm. Mmmmm. Cake?"

So I'm sure you can guess what his favorite part of the day was! He even scored a few swipes of icing before getting his own slice.


I searched high and low for a Lego shirt in Jayson's size to no avail.

So....I made this one using a plain Garanimals shirt (they are apparently no longer selling short sleeved ones at this time of year). That, some cheapo yellow fabric and Wonder-Under (perhaps the best invention for crafting non-sewing kind) and presto! A cutesy lego shirt for my little man.

Oh, and I almost forgot the party hats, but found some plain ones at the dollar store. He kept trying to put one on his friends at the party.


Royal Icing Cookies.

I love how cool these look. It tastes like a big mouthful of sugar (which it pretty much is) But they look so awesome.

I studied a tutorial on sweetopia.net for tips on royal icing. Unfortunately, I didn't have the patience to allow hours (or days) between colors she recommends. So, I did get some bleeding (especially the red)....but I only displayed the best looking ones (of course)


Lego Head Line-Up.
These were originally gonna be cake pops, but they're marshmallow pops instead - since marshmallows are already shaped right, and required no further prep than to dip them in chocolate and draw faces on em.

This is just one of the serving dishes that I made out of legos - I thought it was a fun way to serve up some cookies, candy, and crackers.


Cupcake Tower

While the cupcakes were less than what I expected, and I could have done much better myself (both in looks and taste) the cupcake tower is top-notch. So that is what I'll focus on :)

I commissioned Ben to put this together, and I think it is perfect! And, in his words it is "structurally sound" Which, apparently, my "Jayson" sign was not.


Decorations were simple - balloons and poster board. I used the lego guy on the Lego V.I.P. card as a template for my little lego guys - which were taped up around the room. Some Primary colored table cloths and the party was on!


Thursday, August 26, 2010

Planning J-man's 2nd Birthday

Our Little Builder

I decided to do a lego theme for Jayson's 2nd birthday. Partially in the hope that he will leave our canned goods alone, and focus on the building blocks instead ;) Fat chance, but a mom can dream, can't she?

Hehe.....besides reclaiming my kitchen, I also thought he'd really love the lego thing, especially considering the awesome time he had at the lego shop in Downtown Disney on our last trip to Florida. (He literally climbed into the lego bucket!!)


Lego theme....sounds easy enough to do, right? HA! Considering Legos have been around FOREVER, you'd think they'd have just about anything you could want for a lego party, right? Well, if you thought that, you'd be wrong. NOTHING.....and I literally mean nothing that is age-appropriate for the Duplo-age lego toddlers. Is that gonna stop me....make me change theme? Heck no! Plus, ya'll know that I love making the stuff myself anyways....the lack of commercial party supplies was just the excuse I needed to get my creativity flowing. I looked up some fun ideas online, and made em my own by adding a few touches.


Party Favor Bags:


I just took the cheap-o colored paper bags from WalMart (think .25 ea) and then I bought some plain folders in the matching colors. I cut out circles, and mounted them on the bag with 3D tape. Bada-Bing - Lego Party Favor bags!
(Side note: doing these bags makes me sorely miss all of my craft supplies that are packed away in storage...my 1.5" circle punch would have made this SO much easier!!)


Crayon Rolls:


I have attempted to make these before; this time around, I actually had some idea of what I was doing. I didn't make a pattern or anything, so they're all slightly different sizes. But, hey - they turned out pretty well, if I do say so myself.


I "Lego-fied" them by using wonder-under to piece together the image of a minifigure Lego man on the front - its a simple process of attaching the wonder under to the material using an iron. Then you cut your pieces, peel the backing off, and place them in their desired positions. 10-15 seconds under a hot iron secures them in place! I sewed velcro on them in order to fasten the Crayon rolls. These are so easy to carry with you in a purse, and can provide hours (ha! I wish...more like 2 minutes with J man) of distraction at a doctors office, restaurant, etc.


Lego Chocolates


Yeah, I'm pretty proud of these babies. Even my husband, who SAW me making the little chocolate guys asked me if I bought these once they were all packaged up.

I got some lego molds (yay, swagbucks!) and used wilton's candy melts and candy coloring to make the different legos. I started making the lego blocks into chocolates, but I figured that was a large hunk of chocolate for little kids. So I made more of the little guys instead. I then used photoshop to make the labels - those are actually 4x6 photos (using a standard sized photo print means I didn't have to pay outrageous printing prices for color copies. Instead, you can get them printed when there's a good deal on prints - think 9 cents each!!). I folded the photos in half and stapled them to the top of little lollipop bags from Michaels (yay, 40% off coupons!). The little tags say "Thanks for coming to my Lego Birthday Party" and have various minifigure heads on them. I really like the smirking guy with the goatee.


...there's more to come (that was just the party favors!!!)